> ## Documentation Index
> Fetch the complete documentation index at: https://na-e282180f.mintlify.site/llms.txt
> Use this file to discover all available pages before exploring further.
# Arch Linux
> You're embarking on the Arch Linux journey, eh? Bold move! They say it's not for the faint of heart, or for those who prefer their operating systems pre-chewed. But hey, who needs an easy life when you can have a command line, right?
I suggest not installing this until you are familiar enough with Linux and reading Docs
Its partitioning step is very risky for Beginners
 ## Download the ISO
First things first, grab that Arch Linux ISO from [https://archlinux.org](https://archlinux.org). It's like finding the Holy Grail, but instead of eternal life, you get endless configuration files.
#### 💡 Check: Is your system UEFI or BIOS?
Oh, the age-old question! This is where you play detective with your own computer.
On **Windows**:
1. Press `Win + R`, type `msinfo32` and press Enter
2. Look for **"BIOS Mode"**:
* If it says **UEFI**, choose **GPT**
* If it says **Legacy**, choose **MBR**
***
## Burning the ISO
Now for the digital bonfire! You'll need to burn that ISO onto a USB drive or SD card. Think of it as giving your USB a new, more adventurous purpose. I've listed some tools for you, because who doesn't love options?
* [Balena Etcher](https://etcher.balena.io/) *(So easy, even a beginner could use it... if they weren't too busy being warned away from this whole guide)*
* [Rufus](https://rufus.ie/en/) *(A classic, for when you want a bit more control)*
* [Ventoy](https://www.ventoy.net/en/) *(The multi-ISO maestro)*
#### Example using Rufus:
1. Download and open [Rufus](https://rufus.ie/en/)
2. Plug in your USB drive. Just a friendly reminder: if you have important data on it, kiss it goodbye. It's about to be wiped faster than your memory after a long Arch debugging session.
3. Set the following:
* **Device**: Your USB drive, obviously.
* **Boot selection**: Click **SELECT** and choose the `archlinux-*.iso` file. Don't worry, it won't bite.
* **Partition scheme**:
* Use **MBR** for Legacy BIOS boot (the ancient way)
* Use **GPT** for UEFI boot (the slightly less ancient way)
* **File system**: Leave as **FAT32**. Don't get fancy now.
4. Click **START**
5. If it asks, always choose **"Write in ISO Image mode (Recommended)"**. Because recommendations are usually right, right?
6. Wait. Just wait. It's like watching paint dry, but with more flashing lights.
Voila! Your USB is now a certified Arch Linux boot device. Feel the power!
***
#### Shrinking Windows Partition
Time to make some room for your new obsession. Windows won't know what hit it.
1. Open Disk Management (Win + X → Disk Management)
2. Right-click C: → Shrink Volume
3. Enter an amount in MB. Aim for around 50GB-100GB. You know, just enough to make Windows feel a little cramped.
4. After the shrinking magic, you'll see some unallocated space. That's your future Arch home!
***
#### Entering in BIOS
Prepare for the grand entrance into your system's inner sanctum. This is where you tell your PC who's boss.
1. Restart your PC
2. As soon as it flickers to life, repeatedly mash that **BIOS key**. It's a race against time!
Common keys (because uniformity is overrated):
* `F2` (Dell, Lenovo, Acer, ASUS)
* `Del` (MSI, ASUS desktops)
* `F10` / `Esc` (HP)
* `F12` (boot menu on many systems)
3. **Disable Secure Boot.** Because who needs security when you're installing Arch? (Just kidding, it's usually required).
4. Set your USB as the first boot device. Let's make sure your PC knows its priorities.
## Boot Into the Pendrive
Alright, you're in the Arch live environment. Time to type some commands and feel like a hacker from a 90s movie.
```bash theme={null}
# Makes the font a bit bigger. Because squinting is so last season.
setfont ter-132n
```
```bash theme={null}
# A utility to help you connect to the internet. Because even Arch needs to call home.
iwctl
```
```bash theme={null}
# Lists your networking devices. Generally, 'wlan0' is your Wi-Fi, the unsung hero.
device list
```
```bash theme={null}
# Lists all the Wi-Fi networks around you. Pick one, any one! (Preferably yours).
station wlan0 get-networks
```
```bash theme={null}
# Connects to your Wi-Fi. Hope you remember your password!
station wlan0 connect WifiName
```
Type the passphrase/password
```bash theme={null}
# Exit the iwctl utility. We're done with that for now.
exit
```
```bash theme={null}
# Clears the terminal. A clean slate for new adventures!
clear
```
```bash theme={null}
# Updates the package database. Gotta stay fresh!
pacman -Sy
```
```bash theme={null}
# Install archlinux-keyring because security keys are important, even if we just disabled secure boot.
pacman -S archlinux-keyring
```
## Partitioning
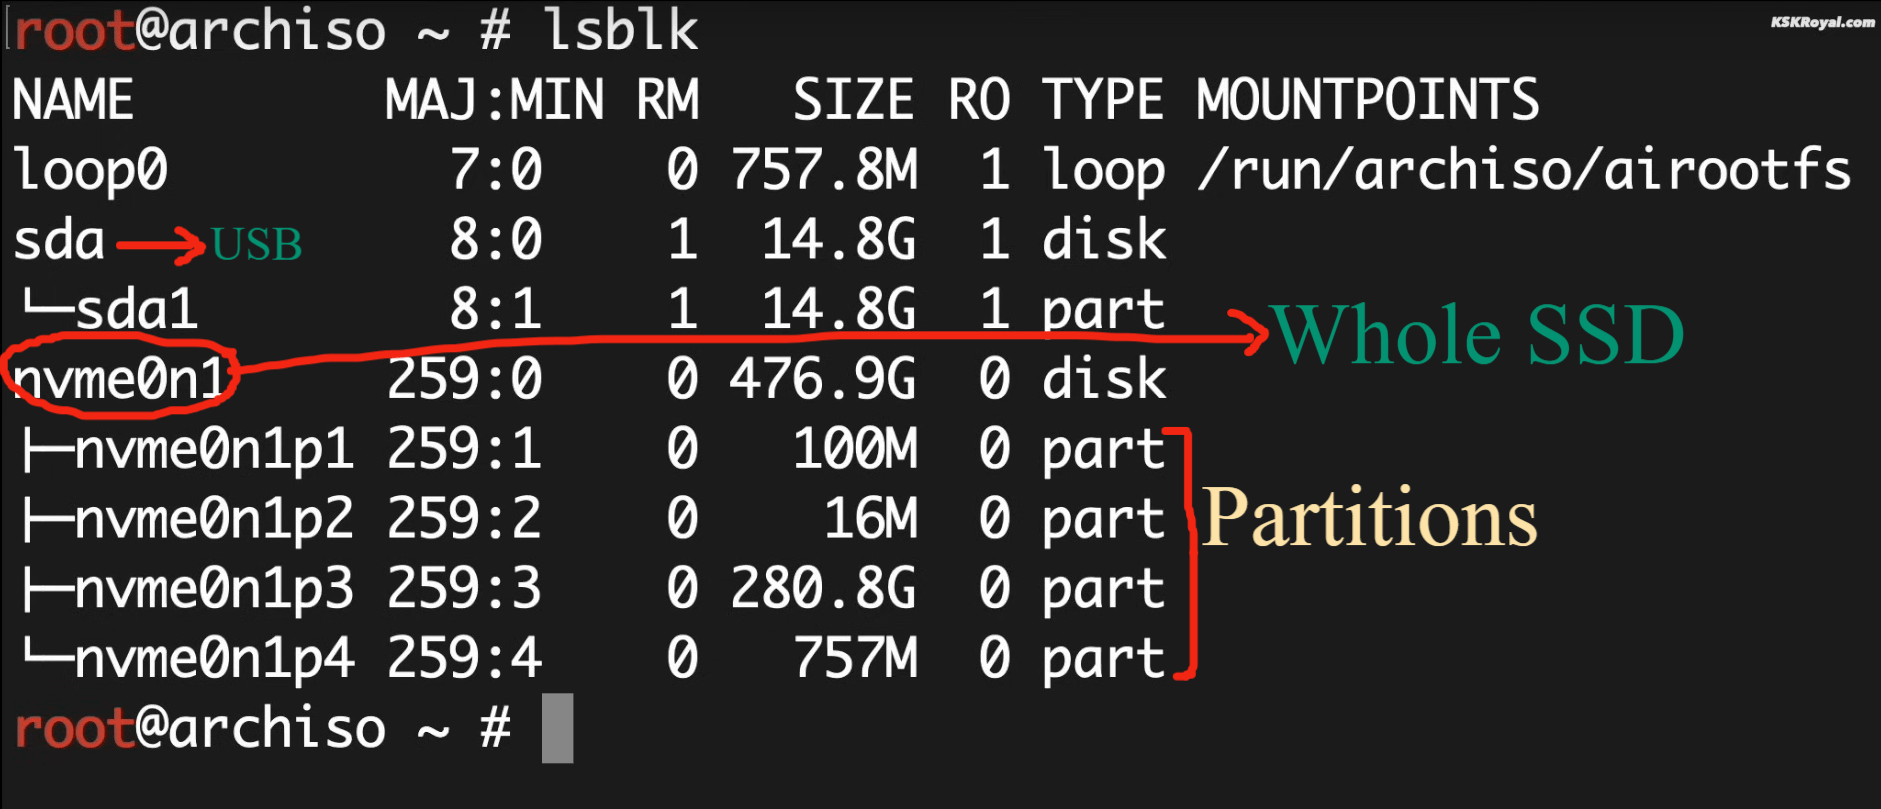
This is the moment of truth! This step is **incredibly delicate**. One wrong move and your data might just vanish into the digital ether. Proceed with the caution of a bomb disposal expert.
```bash theme={null}
# Lets you see the partitions. Stare into the abyss!
lsblk
```
## Download the ISO
First things first, grab that Arch Linux ISO from [https://archlinux.org](https://archlinux.org). It's like finding the Holy Grail, but instead of eternal life, you get endless configuration files.
#### 💡 Check: Is your system UEFI or BIOS?
Oh, the age-old question! This is where you play detective with your own computer.
On **Windows**:
1. Press `Win + R`, type `msinfo32` and press Enter
2. Look for **"BIOS Mode"**:
* If it says **UEFI**, choose **GPT**
* If it says **Legacy**, choose **MBR**
***
## Burning the ISO
Now for the digital bonfire! You'll need to burn that ISO onto a USB drive or SD card. Think of it as giving your USB a new, more adventurous purpose. I've listed some tools for you, because who doesn't love options?
* [Balena Etcher](https://etcher.balena.io/) *(So easy, even a beginner could use it... if they weren't too busy being warned away from this whole guide)*
* [Rufus](https://rufus.ie/en/) *(A classic, for when you want a bit more control)*
* [Ventoy](https://www.ventoy.net/en/) *(The multi-ISO maestro)*
#### Example using Rufus:
1. Download and open [Rufus](https://rufus.ie/en/)
2. Plug in your USB drive. Just a friendly reminder: if you have important data on it, kiss it goodbye. It's about to be wiped faster than your memory after a long Arch debugging session.
3. Set the following:
* **Device**: Your USB drive, obviously.
* **Boot selection**: Click **SELECT** and choose the `archlinux-*.iso` file. Don't worry, it won't bite.
* **Partition scheme**:
* Use **MBR** for Legacy BIOS boot (the ancient way)
* Use **GPT** for UEFI boot (the slightly less ancient way)
* **File system**: Leave as **FAT32**. Don't get fancy now.
4. Click **START**
5. If it asks, always choose **"Write in ISO Image mode (Recommended)"**. Because recommendations are usually right, right?
6. Wait. Just wait. It's like watching paint dry, but with more flashing lights.
Voila! Your USB is now a certified Arch Linux boot device. Feel the power!
***
#### Shrinking Windows Partition
Time to make some room for your new obsession. Windows won't know what hit it.
1. Open Disk Management (Win + X → Disk Management)
2. Right-click C: → Shrink Volume
3. Enter an amount in MB. Aim for around 50GB-100GB. You know, just enough to make Windows feel a little cramped.
4. After the shrinking magic, you'll see some unallocated space. That's your future Arch home!
***
#### Entering in BIOS
Prepare for the grand entrance into your system's inner sanctum. This is where you tell your PC who's boss.
1. Restart your PC
2. As soon as it flickers to life, repeatedly mash that **BIOS key**. It's a race against time!
Common keys (because uniformity is overrated):
* `F2` (Dell, Lenovo, Acer, ASUS)
* `Del` (MSI, ASUS desktops)
* `F10` / `Esc` (HP)
* `F12` (boot menu on many systems)
3. **Disable Secure Boot.** Because who needs security when you're installing Arch? (Just kidding, it's usually required).
4. Set your USB as the first boot device. Let's make sure your PC knows its priorities.
## Boot Into the Pendrive
Alright, you're in the Arch live environment. Time to type some commands and feel like a hacker from a 90s movie.
```bash theme={null}
# Makes the font a bit bigger. Because squinting is so last season.
setfont ter-132n
```
```bash theme={null}
# A utility to help you connect to the internet. Because even Arch needs to call home.
iwctl
```
```bash theme={null}
# Lists your networking devices. Generally, 'wlan0' is your Wi-Fi, the unsung hero.
device list
```
```bash theme={null}
# Lists all the Wi-Fi networks around you. Pick one, any one! (Preferably yours).
station wlan0 get-networks
```
```bash theme={null}
# Connects to your Wi-Fi. Hope you remember your password!
station wlan0 connect WifiName
```
Type the passphrase/password
```bash theme={null}
# Exit the iwctl utility. We're done with that for now.
exit
```
```bash theme={null}
# Clears the terminal. A clean slate for new adventures!
clear
```
```bash theme={null}
# Updates the package database. Gotta stay fresh!
pacman -Sy
```
```bash theme={null}
# Install archlinux-keyring because security keys are important, even if we just disabled secure boot.
pacman -S archlinux-keyring
```
## Partitioning
This is the moment of truth! This step is **incredibly delicate**. One wrong move and your data might just vanish into the digital ether. Proceed with the caution of a bomb disposal expert.
```bash theme={null}
# Lets you see the partitions. Stare into the abyss!
lsblk
```
 ```bash theme={null}
# A utility to help you partition your disks. It's like a surgical tool, so be precise.
cfdisk /dev/nvme0n1
```
```bash theme={null}
# A utility to help you partition your disks. It's like a surgical tool, so be precise.
cfdisk /dev/nvme0n1
```
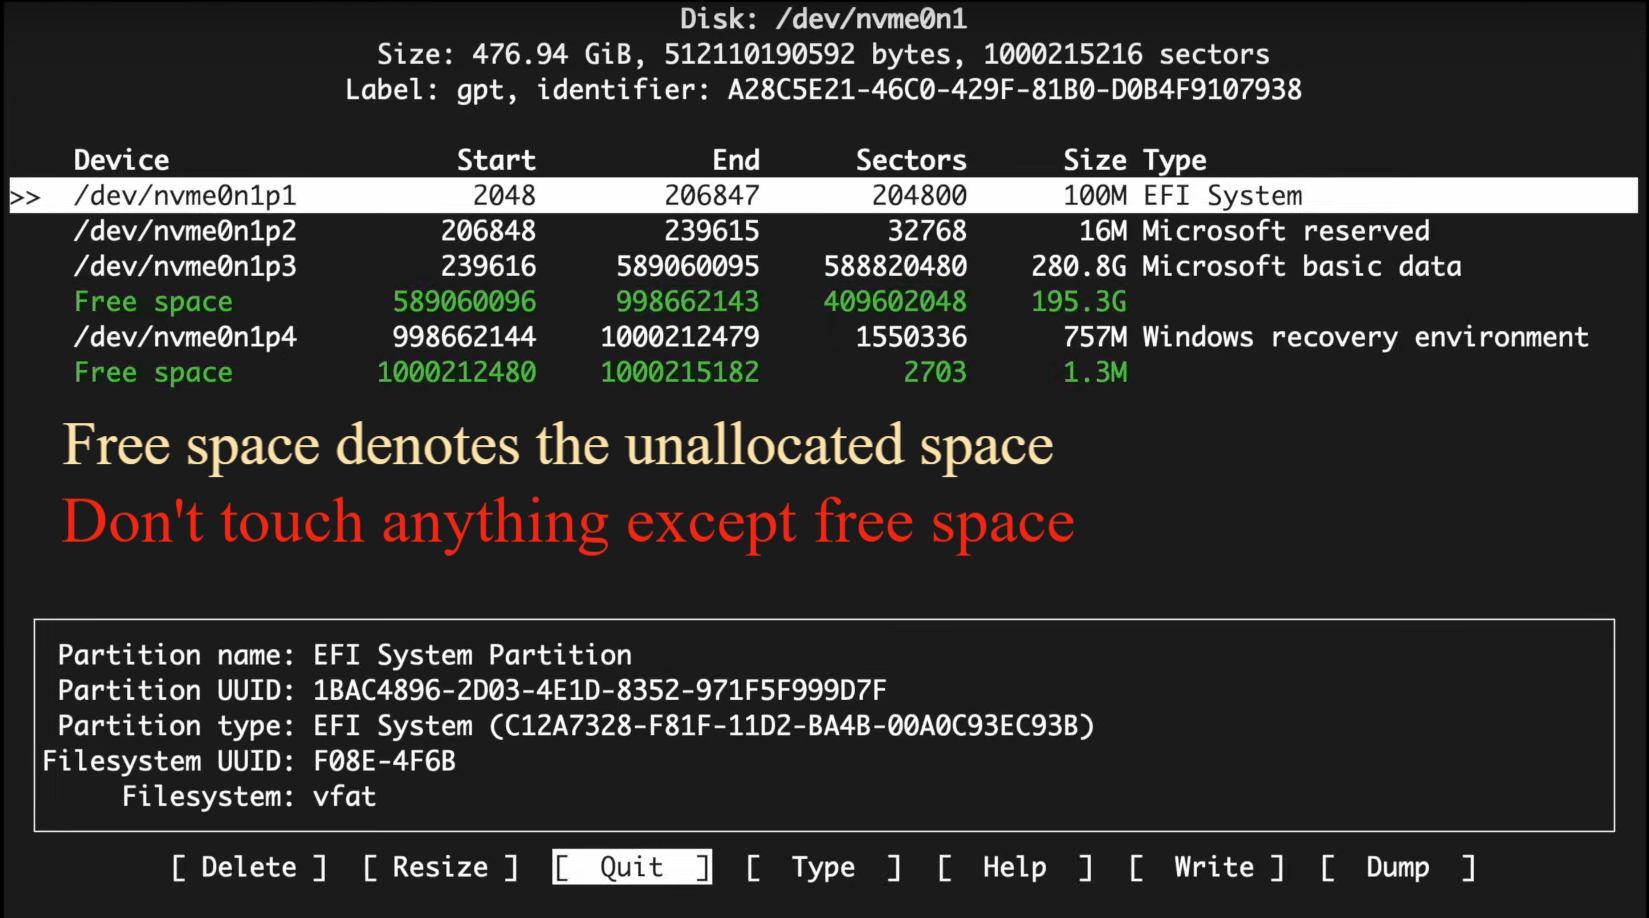 Select that lovely free space you made earlier, and make sure New is highlighted at the bottom.
1. Create a **512M EFI system partition**. This is where your computer looks for boot stuff.
Select that lovely free space you made earlier, and make sure New is highlighted at the bottom.
1. Create a **512M EFI system partition**. This is where your computer looks for boot stuff.
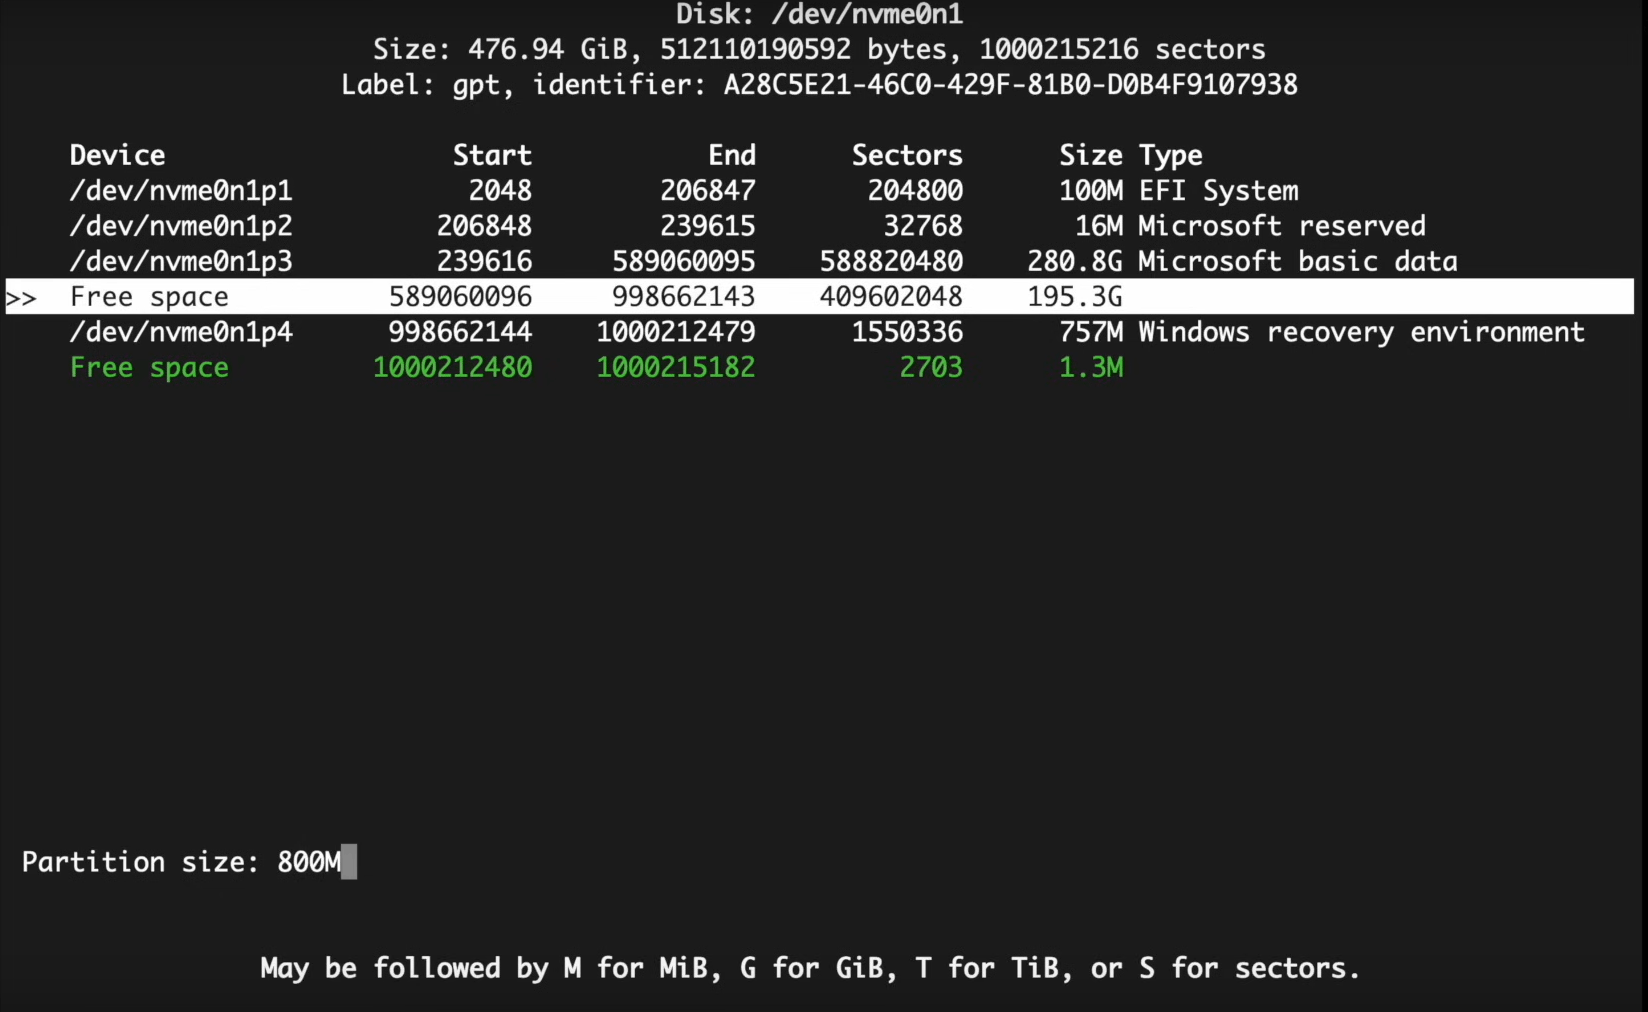 * Press `Enter`
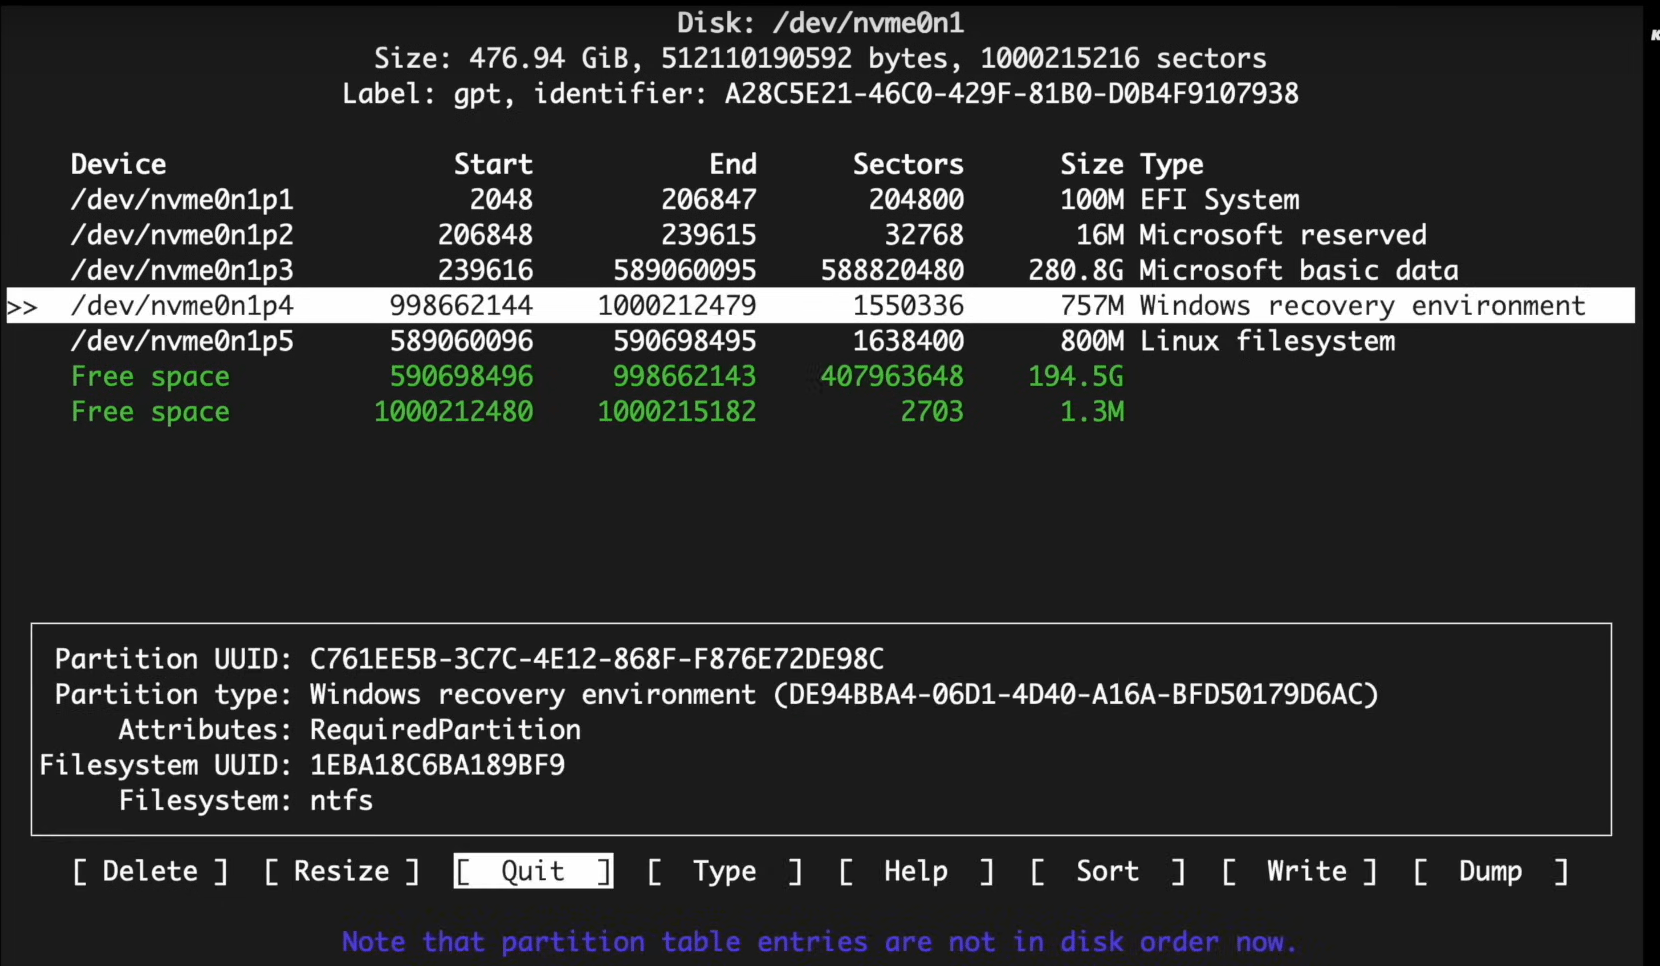 * Select the newly created partition (i.e `p5` here).
* Go on `Type` and press `Enter`.
* Select the newly created partition (i.e `p5` here).
* Go on `Type` and press `Enter`.
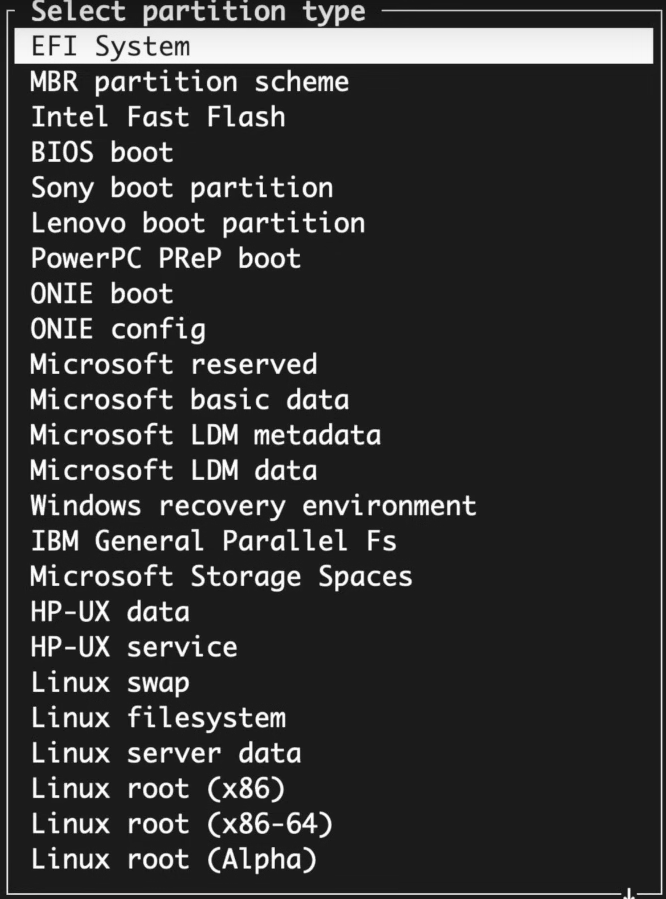 * Choose **EFI System**. Because it's an EFI partition, obviously.
2. Create an **8G (or whatever your RAM is) Linux swap partition**. This is like your computer's temporary memory overflow. If your RAM is huge, you might not even need swap, but better safe than sorry!
3. Create the **remaining space as a Linux filesystem partition**. This will be your main Arch home. Make it big and comfy!
4. **Write** the changes to the disk (be absolutely sure!) and then quit. You've sculpted your storage!
```bash theme={null}
# Formats your EFI partition as FAT-32 (File Access Table). It's like giving it a fresh coat of paint.
mkfs.fat -F32 /dev/[efi_partition_name]
```
```bash theme={null}
# Formats your main Arch partition as EXT4 (Extended File System). This is a robust file system, perfect for your new OS.
mkfs.ext4 /dev/[root_partition_name]
```
```bash theme={null}
# Formats your swap partition. It's ready for action!
mkswap /dev/[swap_partition_name]
```
```bash theme={null}
# Mounts your Root partition to /mnt. This is where the magic begins.
mount /dev/[root_partition_name] /mnt
```
```bash theme={null}
# Create a new directory named boot in /mnt. Think of it as a small, specialized closet.
mkdir /mnt/boot
```
```bash theme={null}
# Mount your EFI partition to this newly created boot folder. Keep things tidy!
mount /dev/[efi_partition_name] /mnt/boot
```
```bash theme={null}
# Start using the Swap. Give your system some breathing room.
swapon /dev/[swap_partition_name]
```
Now, for the love of all that is holy, run `lsblk` again and **VERIFY** that everything is mounted where it should be. Trust me on this one.
## Install Base System
```bash theme={null}
# Install some basic utilities. Your starter pack for Arch enlightenment.
# git => for version control (because you'll be managing dotfiles, oh yes you will)
# sudo => for running commands as admin (because you're not always root, thankfully)
# fastfetch => view your system info (to humblebrag to your friends)
# bluez and bluez-utils => for bluetooth support (because wires are so last century)
# btop => task manager for linux (because htop is good, but btop is prettier)
# reflector => to update mirrorlist (get those packages FAST!)
# nano => minimal terminal based text-editor (your new best friend for config files)
# Replace intel-ucode with amd-ucode if you have an AMD Processor. Don't mix 'em up!
pacstrap -i /mnt base base-devel linux linux-firmware git sudo fastfetch btop intel-ucode nano bluez bluez-utils networkmanager
```
```bash theme={null}
# Generate default mounting configuration. This tells your Arch system where everything is. Crucial!
genfstab -U /mnt >> /mnt/etc/fstab
```
```bash theme={null}
# Display the File Contents (Just to check). Proofread your work, aspiring Arch Master.
cat /mnt/etc/fstab
```
```bash theme={null}
# Changes the root directory to /mnt. You're now officially inside your new Arch installation. Exciting!
arch-chroot /mnt
```
```bash theme={null}
fastfetch
```
Ah, look at that! Your system info, fresh and clean.
#### Setup Reflector
```bash theme={null}
# Backup Old Mirrorlist. Because if you mess up, you'll want a way back.
cp /etc/pacman.d/mirrorlist /etc/pacman.d/mirrorlist.bak
# Finds the fastest mirrors for your package downloads. Say goodbye to slow updates!
reflector --latest 20 --protocol https --sort rate --save /etc/pacman.d/mirrorlist
```
```bash theme={null}
# Sets the password for the ROOT user. Don't forget this one, or you're locked out!
passwd
```
Type your super-secret root password.
### Create Yourself in the Arch World
```bash theme={null}
# Creates a New user and gives them permissions. Because you don't want to live as root forever.
useradd -m -g users -G wheel,storage,power,video,audio -s /bin/bash [username]
```
```bash theme={null}
# Sets the password for your new user. Make it a good one!
passwd [username]
```
Type the password
```bash theme={null}
# Use nano editor and modify user and group permissions. This gives your user sudo powers.
EDITOR=nano visudo
```
Scroll down and **uncomment** `%wheel ALL=(ALL:ALL) ALL`.
This makes users in the `wheel` group (like your new user) able to use `sudo`. It's like giving them a magic wand.
`Ctrl+O` to save changes, `Ctrl+X` to exit.
```bash theme={null}
# Login to the shell as the given user. Get comfortable.
su - [username]
```
```bash theme={null}
# Updates the packages. Because even fresh installs need a quick refresh.
sudo pacman -Syu
```
```bash theme={null}
# Exit the user shell. Back to root for a bit.
exit
```
### Timezone Configuration
```bash theme={null}
# Sets the local time of the PC. For me, it's GMT+0530 (India). Adjust to your timezone, unless you enjoy time travel.
ln -sf /usr/share/zoneinfo/Asia/Kolkata /etc/localtime
```
```bash theme={null}
# Synchronize the system clock. Keep time precise!
hwclock --systohc
```
### Locale Configuration
```bash theme={null}
# Open the locale.gen file so that we can generate locale files. Language is important!
nano /etc/locale.gen
```
Scroll and uncomment `en_US.UTF-8 UTF-8`
```bash theme={null}
# Generate the locale based on locale.gen file. Make it official!
locale-gen
```
```bash theme={null}
nano /etc/locale.conf
```
Write `LANG=en_US.UTF-8`.
### Hosts Configuration
```bash theme={null}
# Sets the hostname for your Linux installation. I usually go with `archlinux` because I'm unoriginal, but you do you!
nano /etc/hostname
```
Write `archlinux` or whatever creative name you've conjured up.
```bash theme={null}
# Configure default hostname mappings with IP addresses. The internet needs to know who you are!
nano /etc/hosts
```
Type the following after a 2-line gap. Make sure to replace `archlinux` with your chosen hostname if it's different.
* Choose **EFI System**. Because it's an EFI partition, obviously.
2. Create an **8G (or whatever your RAM is) Linux swap partition**. This is like your computer's temporary memory overflow. If your RAM is huge, you might not even need swap, but better safe than sorry!
3. Create the **remaining space as a Linux filesystem partition**. This will be your main Arch home. Make it big and comfy!
4. **Write** the changes to the disk (be absolutely sure!) and then quit. You've sculpted your storage!
```bash theme={null}
# Formats your EFI partition as FAT-32 (File Access Table). It's like giving it a fresh coat of paint.
mkfs.fat -F32 /dev/[efi_partition_name]
```
```bash theme={null}
# Formats your main Arch partition as EXT4 (Extended File System). This is a robust file system, perfect for your new OS.
mkfs.ext4 /dev/[root_partition_name]
```
```bash theme={null}
# Formats your swap partition. It's ready for action!
mkswap /dev/[swap_partition_name]
```
```bash theme={null}
# Mounts your Root partition to /mnt. This is where the magic begins.
mount /dev/[root_partition_name] /mnt
```
```bash theme={null}
# Create a new directory named boot in /mnt. Think of it as a small, specialized closet.
mkdir /mnt/boot
```
```bash theme={null}
# Mount your EFI partition to this newly created boot folder. Keep things tidy!
mount /dev/[efi_partition_name] /mnt/boot
```
```bash theme={null}
# Start using the Swap. Give your system some breathing room.
swapon /dev/[swap_partition_name]
```
Now, for the love of all that is holy, run `lsblk` again and **VERIFY** that everything is mounted where it should be. Trust me on this one.
## Install Base System
```bash theme={null}
# Install some basic utilities. Your starter pack for Arch enlightenment.
# git => for version control (because you'll be managing dotfiles, oh yes you will)
# sudo => for running commands as admin (because you're not always root, thankfully)
# fastfetch => view your system info (to humblebrag to your friends)
# bluez and bluez-utils => for bluetooth support (because wires are so last century)
# btop => task manager for linux (because htop is good, but btop is prettier)
# reflector => to update mirrorlist (get those packages FAST!)
# nano => minimal terminal based text-editor (your new best friend for config files)
# Replace intel-ucode with amd-ucode if you have an AMD Processor. Don't mix 'em up!
pacstrap -i /mnt base base-devel linux linux-firmware git sudo fastfetch btop intel-ucode nano bluez bluez-utils networkmanager
```
```bash theme={null}
# Generate default mounting configuration. This tells your Arch system where everything is. Crucial!
genfstab -U /mnt >> /mnt/etc/fstab
```
```bash theme={null}
# Display the File Contents (Just to check). Proofread your work, aspiring Arch Master.
cat /mnt/etc/fstab
```
```bash theme={null}
# Changes the root directory to /mnt. You're now officially inside your new Arch installation. Exciting!
arch-chroot /mnt
```
```bash theme={null}
fastfetch
```
Ah, look at that! Your system info, fresh and clean.
#### Setup Reflector
```bash theme={null}
# Backup Old Mirrorlist. Because if you mess up, you'll want a way back.
cp /etc/pacman.d/mirrorlist /etc/pacman.d/mirrorlist.bak
# Finds the fastest mirrors for your package downloads. Say goodbye to slow updates!
reflector --latest 20 --protocol https --sort rate --save /etc/pacman.d/mirrorlist
```
```bash theme={null}
# Sets the password for the ROOT user. Don't forget this one, or you're locked out!
passwd
```
Type your super-secret root password.
### Create Yourself in the Arch World
```bash theme={null}
# Creates a New user and gives them permissions. Because you don't want to live as root forever.
useradd -m -g users -G wheel,storage,power,video,audio -s /bin/bash [username]
```
```bash theme={null}
# Sets the password for your new user. Make it a good one!
passwd [username]
```
Type the password
```bash theme={null}
# Use nano editor and modify user and group permissions. This gives your user sudo powers.
EDITOR=nano visudo
```
Scroll down and **uncomment** `%wheel ALL=(ALL:ALL) ALL`.
This makes users in the `wheel` group (like your new user) able to use `sudo`. It's like giving them a magic wand.
`Ctrl+O` to save changes, `Ctrl+X` to exit.
```bash theme={null}
# Login to the shell as the given user. Get comfortable.
su - [username]
```
```bash theme={null}
# Updates the packages. Because even fresh installs need a quick refresh.
sudo pacman -Syu
```
```bash theme={null}
# Exit the user shell. Back to root for a bit.
exit
```
### Timezone Configuration
```bash theme={null}
# Sets the local time of the PC. For me, it's GMT+0530 (India). Adjust to your timezone, unless you enjoy time travel.
ln -sf /usr/share/zoneinfo/Asia/Kolkata /etc/localtime
```
```bash theme={null}
# Synchronize the system clock. Keep time precise!
hwclock --systohc
```
### Locale Configuration
```bash theme={null}
# Open the locale.gen file so that we can generate locale files. Language is important!
nano /etc/locale.gen
```
Scroll and uncomment `en_US.UTF-8 UTF-8`
```bash theme={null}
# Generate the locale based on locale.gen file. Make it official!
locale-gen
```
```bash theme={null}
nano /etc/locale.conf
```
Write `LANG=en_US.UTF-8`.
### Hosts Configuration
```bash theme={null}
# Sets the hostname for your Linux installation. I usually go with `archlinux` because I'm unoriginal, but you do you!
nano /etc/hostname
```
Write `archlinux` or whatever creative name you've conjured up.
```bash theme={null}
# Configure default hostname mappings with IP addresses. The internet needs to know who you are!
nano /etc/hosts
```
Type the following after a 2-line gap. Make sure to replace `archlinux` with your chosen hostname if it's different.
 ## Bootloader
```bash theme={null}
# Install packages required to set GRUB as bootloader. Your ticket to boot into Arch!
pacman -S grub efibootmgr dosfstools mtools os-prober
```
```bash theme={null}
# Install GRUB
# This step is according to your harware check your system type and set the target according to it
grub-install --target=x86_64-efi --efi-directory=/boot --bootloader-id=GRUB
```
```bash theme={null}
# Create/Update GRUB config. This scans for operating systems (like Windows!) and adds them to the boot menu, we'll enable the scanning later.
grub-mkconfig -o /boot/grub/grub.cfg
```
```bash theme={null}
# Enable Bluetooth service. Because tangled wires are for savages.
systemctl enable bluetooth
```
```bash theme={null}
# Enable Networking service (Wi-Fi/Ethernet). You want to stay connected, right?
systemctl enable NetworkManager
```
```bash theme={null}
# Exits the chroot environment. You're almost home!
exit
```
```bash theme={null}
# Unmounts all partitions. Gently release them back into the wild.
umount -lR /mnt
```
```bash theme={null}
# Shutdown the PC. The grand finale of this stage!
shutdown now
```
Now, bravely remove the USB drive and press that power button. If all went well, you'll be greeted by GRUB.
Log in with your new user (case-sensitive, don't mess it up!).
```bash theme={null}
# Doubles the font size. Because who wants tiny text after all that work?
setfont -d
```
```bash theme={null}
# Use Network Manager CLI to view device status. Confirm your network card is ready.
nmcli dev status
```
```bash theme={null}
# Switch on the Wifi. Let's get online!
nmcli radio wifi on
```
```bash theme={null}
# List the available WiFi networks. Find your network in the wild.
nmcli dev wifi list
```
```bash theme={null}
# Connect to the wifi. Replace `WifiName` and `WifiPass`. Don't let your efforts be in vain!
sudo nmcli dev wifi connect WifiName password "WifiPass"
```
```bash theme={null}
# Update all the packages. The first of many!
sudo pacman -Syu
```
```bash theme={null}
sudo nano /etc/default/grub
```
Set `GRUB_TIMEOUT` to 20 seconds. This gives you plenty of time to choose between Arch and Windows (if you kept it).
Uncomment `GRUB_DISABLE_OS_PROBER=false`. This is the magic line that makes Windows appear in your GRUB menu. You're dual-booting, you magnificent beast!
Write the changes (`Ctrl+O`) and exit (`Ctrl+X`).
write the changes and exit
```bash theme={null}
# Update the grub config. Make those changes stick!
sudo grub-mkconfig -o /boot/grub/grub.cfg
```
And we are all done, my friend! You've successfully installed Arch Linux. Now the real fun begins: customizing your fresh, minimal install with some glorious dotfiles!
## Dotfiles
Files starting with a `.` are like hidden treasures, holding the keys to your system's configuration and secrets. Get ready to personalize!
### End-4 Dots
## Bootloader
```bash theme={null}
# Install packages required to set GRUB as bootloader. Your ticket to boot into Arch!
pacman -S grub efibootmgr dosfstools mtools os-prober
```
```bash theme={null}
# Install GRUB
# This step is according to your harware check your system type and set the target according to it
grub-install --target=x86_64-efi --efi-directory=/boot --bootloader-id=GRUB
```
```bash theme={null}
# Create/Update GRUB config. This scans for operating systems (like Windows!) and adds them to the boot menu, we'll enable the scanning later.
grub-mkconfig -o /boot/grub/grub.cfg
```
```bash theme={null}
# Enable Bluetooth service. Because tangled wires are for savages.
systemctl enable bluetooth
```
```bash theme={null}
# Enable Networking service (Wi-Fi/Ethernet). You want to stay connected, right?
systemctl enable NetworkManager
```
```bash theme={null}
# Exits the chroot environment. You're almost home!
exit
```
```bash theme={null}
# Unmounts all partitions. Gently release them back into the wild.
umount -lR /mnt
```
```bash theme={null}
# Shutdown the PC. The grand finale of this stage!
shutdown now
```
Now, bravely remove the USB drive and press that power button. If all went well, you'll be greeted by GRUB.
Log in with your new user (case-sensitive, don't mess it up!).
```bash theme={null}
# Doubles the font size. Because who wants tiny text after all that work?
setfont -d
```
```bash theme={null}
# Use Network Manager CLI to view device status. Confirm your network card is ready.
nmcli dev status
```
```bash theme={null}
# Switch on the Wifi. Let's get online!
nmcli radio wifi on
```
```bash theme={null}
# List the available WiFi networks. Find your network in the wild.
nmcli dev wifi list
```
```bash theme={null}
# Connect to the wifi. Replace `WifiName` and `WifiPass`. Don't let your efforts be in vain!
sudo nmcli dev wifi connect WifiName password "WifiPass"
```
```bash theme={null}
# Update all the packages. The first of many!
sudo pacman -Syu
```
```bash theme={null}
sudo nano /etc/default/grub
```
Set `GRUB_TIMEOUT` to 20 seconds. This gives you plenty of time to choose between Arch and Windows (if you kept it).
Uncomment `GRUB_DISABLE_OS_PROBER=false`. This is the magic line that makes Windows appear in your GRUB menu. You're dual-booting, you magnificent beast!
Write the changes (`Ctrl+O`) and exit (`Ctrl+X`).
write the changes and exit
```bash theme={null}
# Update the grub config. Make those changes stick!
sudo grub-mkconfig -o /boot/grub/grub.cfg
```
And we are all done, my friend! You've successfully installed Arch Linux. Now the real fun begins: customizing your fresh, minimal install with some glorious dotfiles!
## Dotfiles
Files starting with a `.` are like hidden treasures, holding the keys to your system's configuration and secrets. Get ready to personalize!
### End-4 Dots
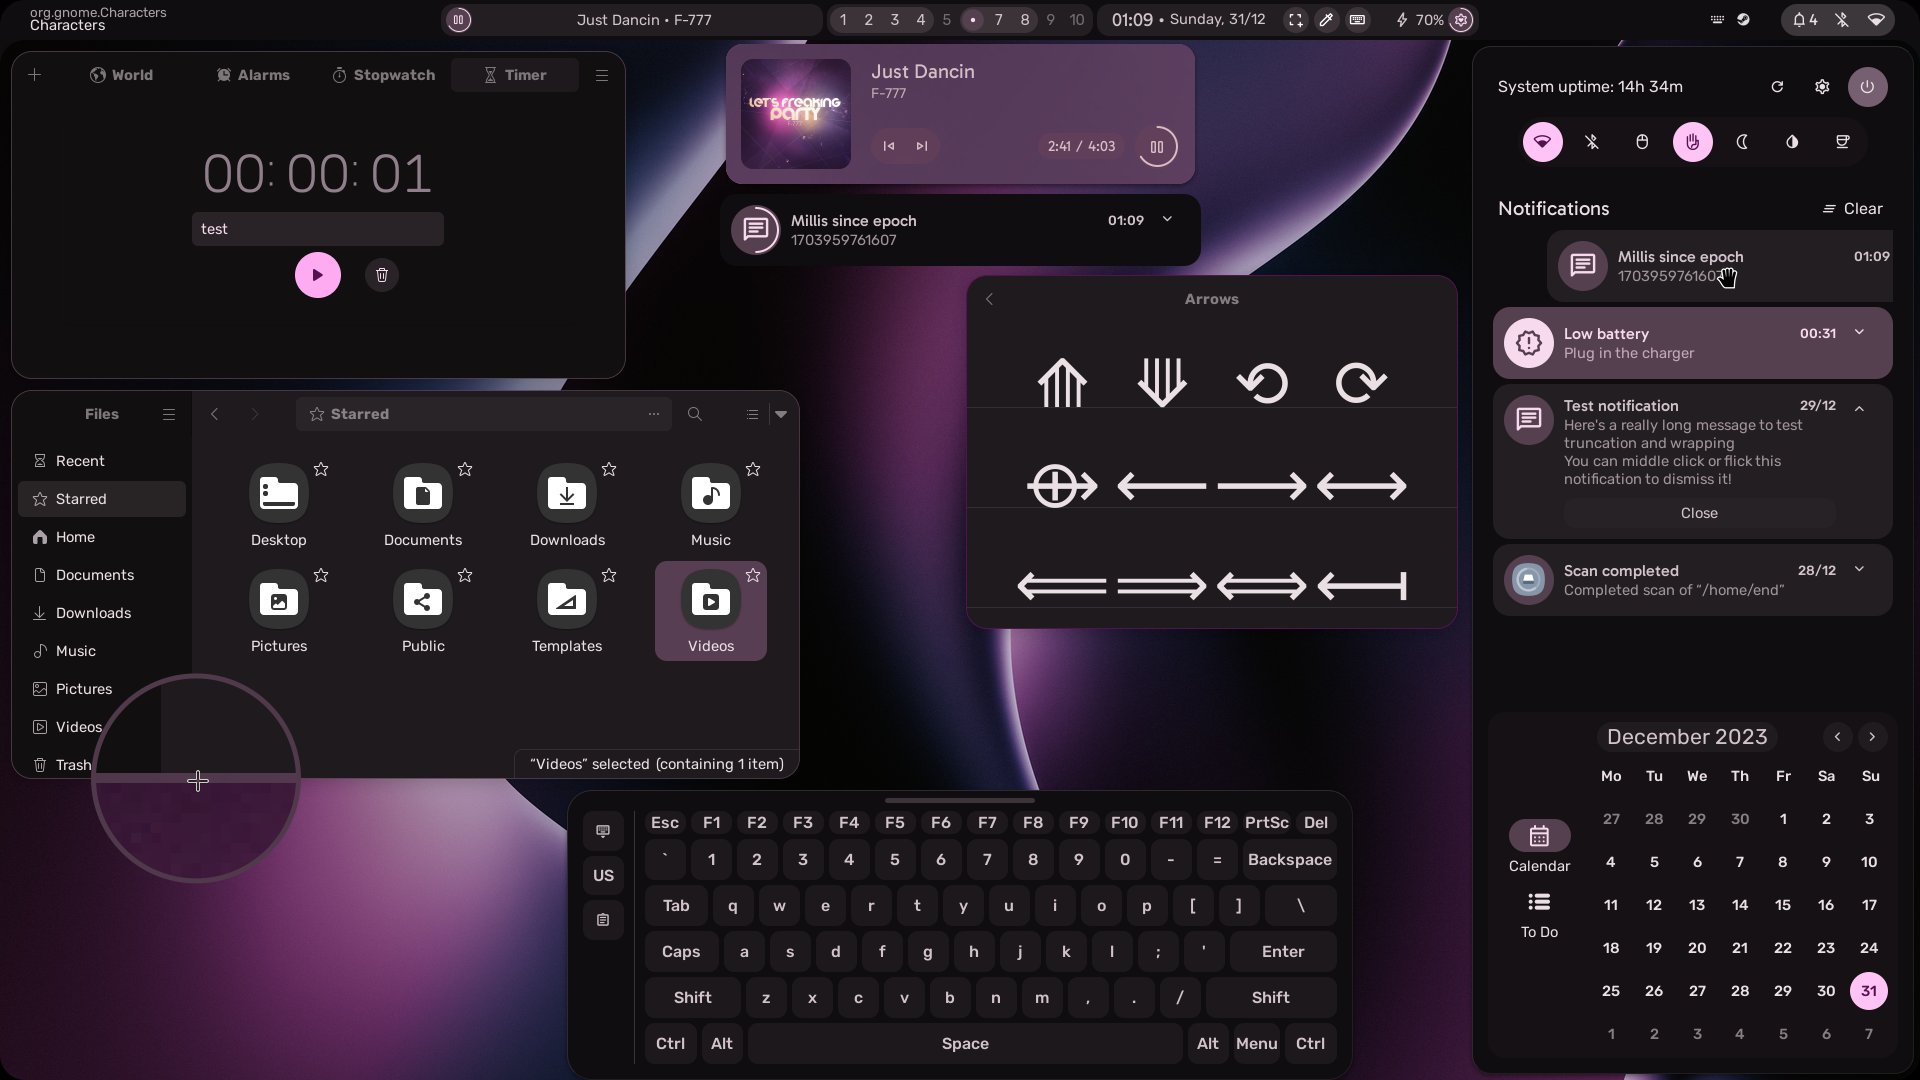 [Official Repo](https://github.com/end-4/dots-hyprland)
```bash theme={null}
# Installation Steps
bash <(curl -s "https://end-4.github.io/dots-hyprland-wiki/setup.sh")
```
### HyDE (Formerly Hyprdots)
[Official Repo](https://github.com/end-4/dots-hyprland)
```bash theme={null}
# Installation Steps
bash <(curl -s "https://end-4.github.io/dots-hyprland-wiki/setup.sh")
```
### HyDE (Formerly Hyprdots)
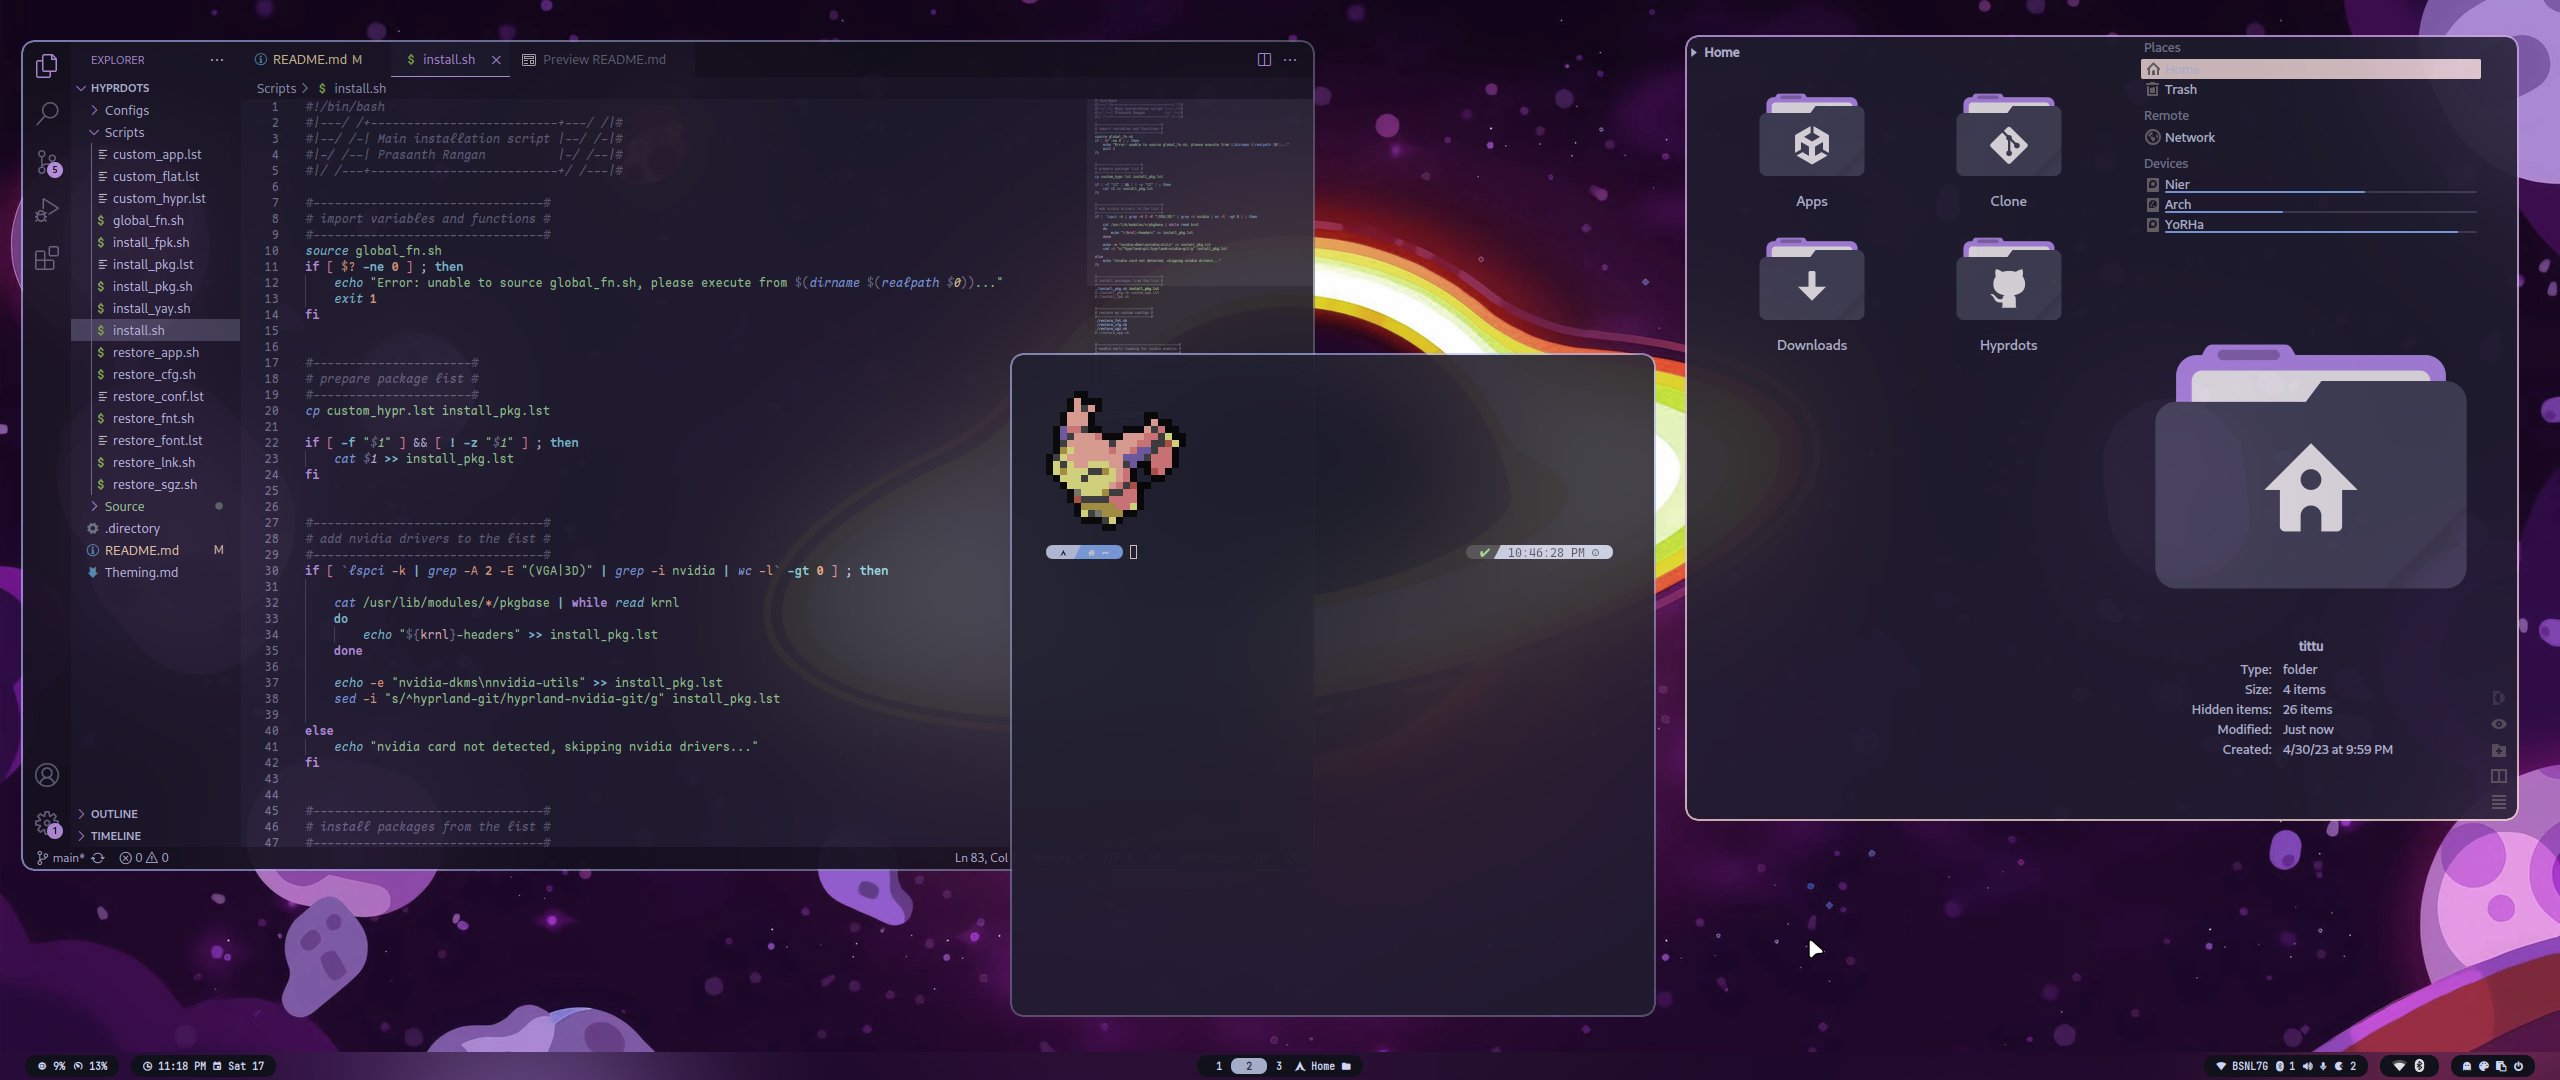 [Official Repo](https://github.com/Hyde-project/hyde)
```bash theme={null}
# Installation Steps
pacman -S --needed git base-devel
git clone --depth 1 https://github.com/HyDE-Project/HyDE ~/HyDE
cd ~/HyDE/Scripts
./install.sh
```
### ML4W Dotfiles
[Official Repo](https://github.com/Hyde-project/hyde)
```bash theme={null}
# Installation Steps
pacman -S --needed git base-devel
git clone --depth 1 https://github.com/HyDE-Project/HyDE ~/HyDE
cd ~/HyDE/Scripts
./install.sh
```
### ML4W Dotfiles
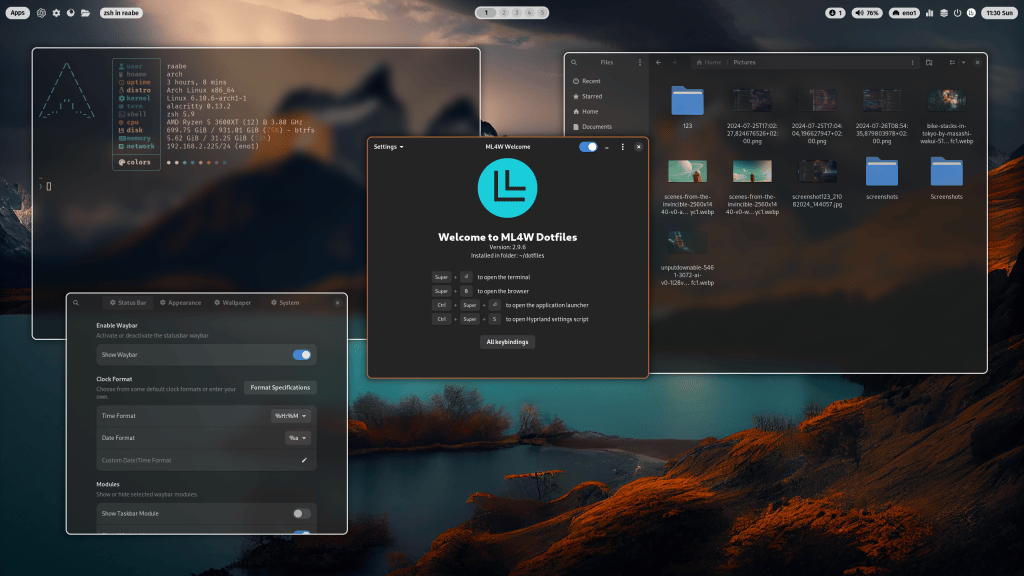 [Official Repo](https://github.com/mylinuxforwork/dotfiles)
```bash theme={null}
# Installation Steps
bash -c "$(curl -s https://raw.githubusercontent.com/mylinuxforwork/dotfiles/main/setup-arch.sh)"
```
### Custom
Feeling brave? If pre-packaged dotfiles aren't your style, here's a minimal Hyprland setup to get you started. Because sometimes, less is more (and more challenging).
```bash theme={null}
# Package Details
# hyprland => The fancy new Desktop Environment. Welcome to the Wayland era!
# dunst => Notification service. So you know when something important happens (like new emails, or if your cat walked across the keyboard).
# kitty => Terminal application. Because you'll be spending a lot of time here.
# pipewire & wireplumber => Audio related packages. Because silent systems are just sad.
# nautilus => File manager. For when the terminal isn't enough (rarely).
# vlc => Media player. To watch all those cat videos you downloaded.
# ttf-* & noto-* => Fonts. Because text needs to look pretty.
# hyprcursor => Cursor for Hyprland. Your pointer will be stylish!
# firefox => Web Browser. To download more Arch guides, obviously.
# libinput => For Touchpad and Mouse. So you can actually use your computer.
# sddm => Display Manager. Your graphical login screen.
# flatpak => For installing some extra applications available on Flathub. Because sometimes, you just need an app without compiling it yourself.
sudo pacman -S hyprland dunst kitty xdg-desktop-portal-hyprland qt5-wayland qt6-wayland pipewire nautilus vlc clang cargo firefox noto-fonts noto-fonts-emoji ttf-dejavu ttf-font-awesome hyprlang hyprcursor polkit-kde-agent wireplumber libinput sddm flatpak
```
[Official Repo](https://github.com/mylinuxforwork/dotfiles)
```bash theme={null}
# Installation Steps
bash -c "$(curl -s https://raw.githubusercontent.com/mylinuxforwork/dotfiles/main/setup-arch.sh)"
```
### Custom
Feeling brave? If pre-packaged dotfiles aren't your style, here's a minimal Hyprland setup to get you started. Because sometimes, less is more (and more challenging).
```bash theme={null}
# Package Details
# hyprland => The fancy new Desktop Environment. Welcome to the Wayland era!
# dunst => Notification service. So you know when something important happens (like new emails, or if your cat walked across the keyboard).
# kitty => Terminal application. Because you'll be spending a lot of time here.
# pipewire & wireplumber => Audio related packages. Because silent systems are just sad.
# nautilus => File manager. For when the terminal isn't enough (rarely).
# vlc => Media player. To watch all those cat videos you downloaded.
# ttf-* & noto-* => Fonts. Because text needs to look pretty.
# hyprcursor => Cursor for Hyprland. Your pointer will be stylish!
# firefox => Web Browser. To download more Arch guides, obviously.
# libinput => For Touchpad and Mouse. So you can actually use your computer.
# sddm => Display Manager. Your graphical login screen.
# flatpak => For installing some extra applications available on Flathub. Because sometimes, you just need an app without compiling it yourself.
sudo pacman -S hyprland dunst kitty xdg-desktop-portal-hyprland qt5-wayland qt6-wayland pipewire nautilus vlc clang cargo firefox noto-fonts noto-fonts-emoji ttf-dejavu ttf-font-awesome hyprlang hyprcursor polkit-kde-agent wireplumber libinput sddm flatpak
```